
Popular categories
Looking for a yarn?


|
||||||||||||||||||||||||||||||||||||||||
Beach Ballet |
||||||||||||||||||||||||||||||||||||||||
 |
 |
|||||||||||||||||||||||||||||||||||||||
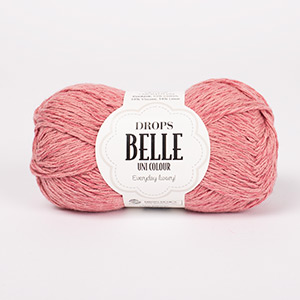
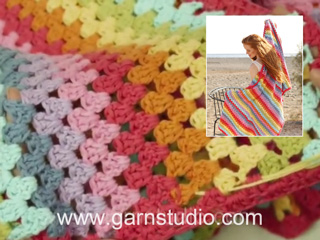
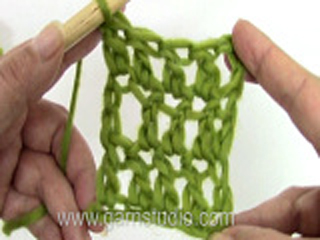
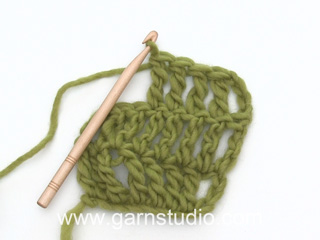
Crocheted top in DROPS Belle. The piece is worked with wrap-around style, double crochets and fans. The piece is worked top down. Sizes S - XXXL.
DROPS 199-47 |
||||||||||||||||||||||||||||||||||||||||
|
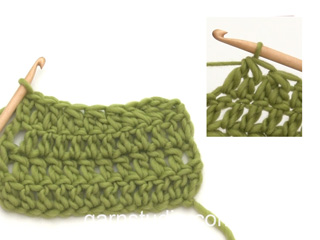
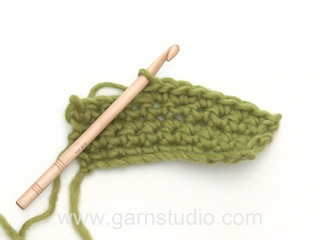
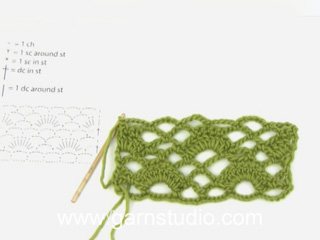
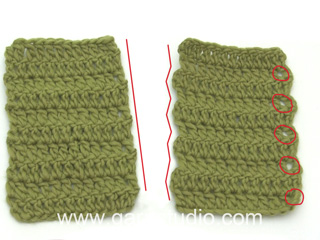
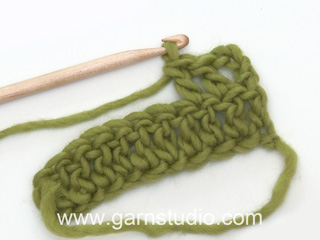
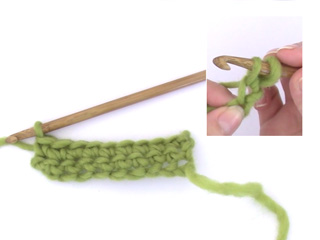
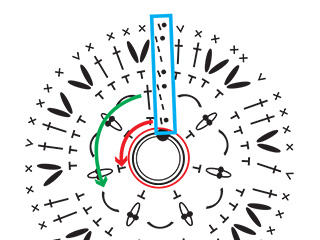
------------------------------------------------------- EXPLANATIONS FOR THE PATTERN: ------------------------------------------------------- CROCHET INFORMATION: First double crochet at the beginning of each row is replaced by 3 chain stitches. INCREASE TIP: Increase 1 double crochet by working 2 double crochets in same double crochet. Increase 2 stitches by working as shown in A.4 on right front piece and A.5 on left front piece – NOTE: First treble crochet at beginning of each row is replaced by 4 chain stitches. DECREASE TIP (for sides): Decrease 1 double crochet by working 2 double crochets together as follows: * Make 1 yarn over, insert hook through next stitch, pick up strand, 1 yarn over and pull strand through the first 2 loops on hook *, work from *-* 1 more time, make 1 yarn over and pull strand through all 3 loops on hook(= 1 double crochet decreased). PATTERN: See diagrams A.1 to A.7. (A.6 shows how rounds start and finish). INCREASE/DECREASE TIP (evenly spaced): To work out how to decrease/increase evenly, count the total number of stitches, (e.g. 68 stitches) and divide by number of decreases/increases to be made (e.g. 4) = 17. In this example, decrease by working together each 16th and 17th stitch. When increasing work 2 double crochets in each 17th double crochet. ------------------------------------------------------- START THE PIECE HERE: ------------------------------------------------------- TOP - SHORT OVERVIEW OF THE PIECE: Front and back pieces are worked back and forth separately, top down. The pieces are sewn together, and then you work fans along the bottom edge. The sleeves are worked back and forth, top down as far as the armholes, and then worked in the round. A small decorative edge is worked along the front pieces/back piece/neck. The top is wrapped around by placing the right front piece on top of the left front piece and then tying around the waist. RIGHT FRONT PIECE: Work 21-22-22-25-24-25 chain stitches with hook size 4 mm = US 6 and Belle. Turn and work 1 double crochet in the 4th chain stitch from the hook (= 2 double crochets), work 1 double crochet in each of the next 5-6-6-3-2-3 chain stitches, * skip 1 chain stitch, work 1 double crochet in each of the next 5 chain stitches *, work from *-* to end of row = 17-18-18-20-19-20 double crochets. Work a total of 6-7-8-6-7-6 rows with 1 double crochet in each double crochet – read CROCHET INFORMATION and REMEMBER THE CROCHET GAUGE! Then increase to neck and armholes at the same time as follows: NECK: On the next row (= from the right side) start to increase for neck at the end of the row – read INCREASE TIP. Increase by 1 double crochet a total of 2-3-3-0-1-1 times, then increase 2 stitches (as shown in A.4) a total of 19-19-20-26-26-29 times (= a total of 40-41-43-52-53-59 double crochets increased for neck). ARMHOLE: When the piece measures 16-16-16-17-16-14 cm = 6¼"-6¼"-6¼"-6¾"-6¼"-5 172" start to increase for armhole – read INCREASE TIP. Increase 1 double crochet 0-1-1-1-0-1 time, then increase 2 stitches 0-1-2-3-5-7 times. At the end of the first row from the wrong side work 5-5-6-7-8-8 loose chain stitches (including 3 chain stitches to turn with) for the armhole (= a total of 3-6-9-12-16-21 double crochets increased for armhole). The piece measures approx. 19-20-21-22-23-24 cm = 7½"-8"-8¼"-8¾"-9"-9½". Turn and work 1 double crochet in the 4th chain stitch from the hook (= 2 double crochets), work 1 double crochet in each of the next 1-1-2-3-4-4 chain stitches and work to end of row as before. On the next row decrease 1 double crochet in the side (i.e. towards the armhole) – read DECREASE TIP. Decrease like this every 2nd row a total of 4 times (=4 double crochets decreased), the increases for neck continue as before. When all the decreases (towards the side) and increases (for neck and armhole) are finished there are 56-61-66-80-84-96 double crochets on the last row. The piece measures approx. 30-32-34-36-38-40 cm = 11¾"-12½"-13⅜"-14¼"-15"-15¾" from the shoulder down. Cut and fasten strand. LEFT FRONT PIECE: Work 21-22-22-25-24-25 chain stitches with hook size 4 mm = US 6 and Belle. Turn and work 1 double crochet in the 4th chain stitch from the hook (= 2 double crochets), work 1 double crochet in each of the next 5-6-6-3-2-3 chain stitches, * skip 1 chain stitch, work 1 double crochet in each of the next 5 chain stitches *, work from *-* to end of row = 17-18-18-20-19-20 double crochets. Work a total of 6-7-8-6-7-6 rows with 1 double crochet in each double crochet – read CROCHET INFORMATION and REMEMBER THE CROCHET GAUGE! Then increase to neck and armholes at the same time as follows: NECK: On the next row (= from the right side) start to increase for neck at the beginning of the row – remember INCREASE TIP. Increase by 1 double crochet a total of 2-3-3-0-1-1 times, then increase 2 stitches (as shown in A.5) a total of 19-19-20-26-26-29 times (= a total of 40-41-43-52-53-59 double crochets increased for neck). ARMHOLE: When the piece measures 16-16-16-17-16-14 cm = 6¼"-6¼"-6¼"-6¾"-6¼"-5½" start to increase for the armhole – read INCREASE TIP. Increase 1 double crochet 0-1-1-1-0-1 time, then increase 2 stitches 0-1-2-3-5-7 times. At the end of the first row from the right side work 5-5-6-7-8-8 loose chain stitches (including 3 chain stitches to turn with) for the armhole (= a total of 3-6-9-12-16-21 double crochets increased for the armhole). The piece measures approx. 19-20-21-22-23-24 cm = 7½"-8"-8¼"-8¾"-9"-9½". Turn and work 1 double crochet in the 4th chain stitch from the hook (= 2 double crochets), work 1 double crochet in each of the next 1-1-2-3-4-4 chain stitches and work to end of row as before. On the next row decrease 1 treble crochet in the side (i.e. towards the armhole) – remember DECREASE TIP. Decrease like this every 2nd row a total of 4 times (=4 double crochets decreased), the increases for neck continue as before. When all the decreases (towards the side) and increases (for neck and armhole) are finished there are 56-61-66-80-84-96 double crochets on the last row. The piece measures approx. 30-32-34-36-38-40 cm = 11¾"-12½"-13⅜"-14¼"-15"-15¾" from the shoulder down. Cut and fasten strand. BACK PIECE: RIGHT SHOULDER: Work 21-22-22-25-24-25 chain stitches with hook size 4 MM = US 6 and Belle. Turn and work first row from wrong side as follwos: work 1 double crochet in 4th chain stitch from hook (= 2 double crochets), then work 1 double crochet in each of the next 5-6-6-3-2-3 chains, * skip 1 chain stitch, crochet 1 double crochet in each of the next 5 chain stitches*, repeat from *-* to end of row = 17-18-18-20-19-20 double crochets. Cut the strand and put aside LEFT SHOULDER: Work 21-22-22-25-24-25 chain stitches with hook size 4 MM = US 6 and Belle. Turn and work first row from wrong side as follows: 1 double crochet in 4th chain stitch from the hook (= 2 double crochets), work 1 double crochet in each of the next 5-6-6-3-2-3 chain stitches, * skip 1 chain stitch, work 1 double crochet in each of the next 5 chain stitches *, work from *-* to end of row = 17-18-18-20-19-20 double crochets. On the next row (from right side), crochet 1 double crochet in each double crochet until 1 double crochet remains and work 2 double crochets in the last double crochet (towards the neck = 18-19-19-21-20-21 double crochets for left shoulder. Then crochet loosely 30-30-32-32-34-34 chain stitches for neck, take right shoulder and starting from right side, crochet 1 double crochet in each of the next 16-17-17-19-18-19 double crochets (= 18-19-19-21-20-21 double crochets for right shoulder). BACK PIECE: Start on left shoulder (from wrong side) and work 1 double crochet in each of the first 18-19-19-21-20-21 double crochets, work 1 double crochet in each of the 30-30-32-32-34-34 chain stitches in the neck and 1 double crochet in each of the 18-19-19-21-20-21 double crochets on right shoulder = 66-68-70-72-74-76 double crochets. Work 1 double crochet in each double crochet until the piece measures 16-16-16-17-16-14 cm = 6¼"-6¼"-6¼"-6¾"-6¼"-5½". Now start to increase for the armholes on each side of the piece as follows: Increase 1 double crochet 0-1-1-1-0-1 times, then 2 double crochets 0-1-2-3-5-7 times = 66-74-80-86-94-106 double crochets. Cut the strand. Work the next row as follows: Work 3-3-4-5-6-6 loose chain stitches for the armhole, 1 double crochet in each double crochet and finish with 5-5-6-7-8-8 loose chain stitches (including 3 chain stitches to turn with) for the armhole = 72-80-88-96-106-118 stitches. Turn and work 1 double crochet in 4th chain stitch from hook (= 2 double crochets), work 1 double crochet in each of the next 1-1-2-3-4-4 chain stitches, 1 double crochet in each double crochet and 1 double crochet in each of the 3-3-4-5-6-6 last chain stitches = 72-80-88-96-106-118 double crochets. On the next row decrease 1 double crochet on each side of the piece – remember DECREASE TIP. Decrease like this every 2nd row a total of 4 times = 64-72-80-88-98-110 double crochets. Continue working until you have the same number of rows as on the front pieces, i.e. the piece measures approx. 30-32-34-36-38-40 cm = 11¾"-12½"-13⅜"-14¼"-15"-15¾" from the shoulder down. Cut and fasten strand. ASSEMBLY: Sew shoulder seams and side seams - sew in outermost loop of outermost stitch so the seam is flat. FAN-EDGE (bottom edge): = 176-194-212-248-266-302 double crochets on last row (both front and back pieces). Start on right front piece from the wrong side and work as follows: Work A.1 over the first 4 double crochets, A.2 until there is 1 double crochet left (= 19-21-23-27-29-33 repeats of 9 double crochets) and finish with A.3 over the last double crochet. When A.1 to A.3 have been completed, cut and fasten the strand. DECORATIVE EDGE (along front pieces and back piece/neck): Start at bottom of tip on right front piece from the right side and fasten the strand with 1 slip stitch in the first stitch. Work 1 single crochet around the first row, * 3 chain stitches, 1 single crochet around next row *, work from *-* along the whole front piece, neck and down the left front piece, finishing at the tip. Cut and fasten the strand. SLEEVE: The sleeve is worked top down, starting with the sleeve cap. Work 42-48-44-45-42-46 chain stitches (including 3 chain stitches to turn with) with hook size 4 mm = US 6 and Belle. Turn and work 1 double crochet in 4th chain stitch from the hook (= 2 double crochets), work 1 double crochet in each of the next 2-1-4-5-2-6 chain stitches, * skip 1 chain stitch, work 1 double crochet in each of the next 5 chain stitches *, work from *-* to end of row = 34-39-36-37-34-38 double crochets. On the next row increase 2 double crochets on each side of the piece (increase 2 double crochets by working 3 double crochets in same double crochet). Increase like this a total of 7-7-8-8-9-9 times on each side = 62-67-68-69-70-74 double crochets. Cut the strand. Work 3-3-4-5-6-6 loose chain stitches for armhole, work 1 double crochet in each of the 62-67-68-69-70-74 double crochets and finish with 3-3-4-5-6-6 loose chain stitches for armhole. Then join the piece with 1 slip stitch in the first chain stitch = 68-73-76-79-82-86 stitches. Now work in the round as follows: Work A.6 (shows how rounds start and finish), repeat A.7 to end of round (= 7-8-8-9-9-10 repeats of 9 double crochets) – AT THE SAME TIME on the first round adjust the number of stitches by increasing/decreasing to 64-73-73-82-82-91 double crochets – read INCREASE/DECREASE TIP. Continue until A.6 and A.7 have been completed. Cut and fasten strand. Work the other sleeve in the same way. ASSEMBLY: Sew in sleeves - sew in outermost loop of outermost stitch so the seam is flat. TWISTED CORD: Cut 2 strands measuring 6 metres = 240" of Belle. Twist them together until they begin to resist, fold double and they will continue to twist. Tie a knot in each end. Tie one end to the tip of the right front piece. Make 1 more cord in the same way and tie to the tip of the left piece. |
||||||||||||||||||||||||||||||||||||||||
Diagram explanations |
||||||||||||||||||||||||||||||||||||||||
|
||||||||||||||||||||||||||||||||||||||||

|
||||||||||||||||||||||||||||||||||||||||

|
||||||||||||||||||||||||||||||||||||||||

|
||||||||||||||||||||||||||||||||||||||||

|
||||||||||||||||||||||||||||||||||||||||
|
Have you made this or any other of our designs? Tag your pictures in social media with #dropsdesign so we can see them! Do you need help with this pattern?You'll find tutorial videos, a Comments/Questions area and more by visiting the pattern on garnstudio.com. © 1982-2024 DROPS Design A/S. We reserve all rights. This document, including all its sub-sections, has copyrights. Read more about what you can do with our patterns at the bottom of each pattern on our site. |
||||||||||||||||||||||||||||||||||||||||


With over 40 years in knitting and crochet design, DROPS Design offers one of the most extensive collections of free patterns on the internet - translated to 17 languages. As of today we count 304 catalogs and 11422 patterns - 11417 of which are translated into English (US/in).
We work hard to bring you the best knitting and crochet have to offer, inspiration and advice as well as great quality yarns at incredible prices! Would you like to use our patterns for other than personal use? You can read what you are allowed to do in the Copyright text at the bottom of all our patterns. Happy crafting!
Comments / Questions (82)
Fin top til min datter
20.05.2024 - 20:14Ich habe dieses Top genau nach Anleitung gehäkelt und festgestellt, es ist definitiv zu kurz und lässt sich nucht so schließen, wie auf dem Foto. Also noch einmal neu angefangen und deutlich länger und was soll ich sagen, es ist immer noch zu kurz. Ich bin nicht sicher, ob Größe S eigentlich für ein Kind gedacht war. Meiner Tochter passt das Oberteil nur mit massiven Veränderungen.
20.05.2024 - 02:46Rigtig fin top som min datter ønsker sig
06.05.2024 - 21:32Witam. Nie potrafię wszyć rękawa. Robię rozmiar XXL. Liczba oczek się zgadza. Utrzymuję stałe napięcie nitki. Rękaw kształtem ani rozmiarem nie pasuje do ramienia i pachy gdzie powinien być wszyty. Nie odpowiada też kształtem rysunkowi. Jest o jakieś 3cm za krótki. A bez naciągania do pachy - powstaje dziura.
30.04.2024 - 05:59DROPS Design answered:
Witaj Kamilo, trudno mi powiedzieć nie widząc robótki. Co do zasady główka rękawa (ta zaokrąglona część na górze) powinna mieć taką samą/zbliżoną długość jak obwód otworu na wszycie rękawa. Jeżeli otwór na rękaw ma dobrą szerokość, to jedyne co można teraz zrobić to wydłużyć główkę rękawa, przerabiając kilka dodatkowych rzędów. Spróbuj na jednym rękawie, przypnij szpilkami i zobacz czy pasuje. W razie pytań pisz. Pozdrawiamy!
30.04.2024 - 12:31I don't understand this pattern at all. I thought it was my inexperience using diagrams but the diagram lesson doesn't even fit. i.e. why is a circle fraction used when I'm not working a circle, nor am I I repeating the fraction. Perhaps consider writing the pattern out.
20.04.2024 - 17:44DROPS Design answered:
DearClaire, we use (mostly) diagrams not only because our patterns are available in many languages, but also we believe that with diagrams you can also see the "bigger picture" in other words, not only the very next step (stitch) but also how rows and stitches relate to each other. A.1 /A.2 pattern is not a "circle fraction" but stitches at the beginning/end of a row, with increases. Happy Crafting!
20.04.2024 - 22:54Bonjour\\r\\nMerci pour votre réponse rapide\\r\\nPour les augmentations A4 et A5 le diagramme montre des doubles brides et vous indiquez dans les explications simples brides\\r\\nDoit on faire double bride ou simple bride ?\\r\\n\\r\\nMerci pour votre réponse\\r\\n\\r\\nCordialement\\r\\n\\r\\nCarine HERMAND
08.04.2024 - 14:06DROPS Design answered:
Bonjour Mme Hermand, quand vous augmentez 1 maille, vous augmentez 1 bride en crochetant 2 brides dans la même bride du rang précédent, quand vous augmentez 2 brides, crochetez les augmentations comme indiqué par A.4 et A.5 (= double-brides). Bon crochet!
08.04.2024 - 15:39Je ne comprends pas L'ouvrage mesure environ 19-20-21-22-23-24 cm. Tourner et crocheter 1 bride dans la 4ème maille en l'air à partir du crochet (= 2 brides), 1 bride dans chacune des 1-1-2-3-4-4 mailles en l'air suivantes et crocheter jusqu'à la fin du rang comme avant.
07.04.2024 - 20:21DROPS Design answered:
Bonjour Mme Hermand, vous avez monté 5 à 8 mailles en l'air (cf taille) à la fin du rang suivant, on explique ici comment crocheter ces nouvelles mailles en l'air: commencez par 1 bride dans la 4ème maille en l'air à partir du crochet (les 3 ml = 1ère bride), puis crochetez 1 bride dans chacune des mailles en l'air restantes et terminez le rang comme avant. Bon crochet!
08.04.2024 - 09:12Apologies if this has already been answered in a previous post. With the neck increases at the beginning, it says to do on the end of the row, then 2 increases as following A4. Are the increases then only still to be done at the end of the row? And the diagram shows the end of the rows only omitting to show the beginning of each row? I see the incerases taking place around the ch1 space but then there's no example of a ch3/ch4 after each turn? Thanks, Georgina
26.02.2024 - 23:52DROPS Design answered:
Dear Georgina, the first increase for neck is worked at the end of the row from right side on right front piece, but you will now increase on every row, this means at the beg of every row from wrong side just as shown in diagram A.4. See INCREASE TIP at the beg of the written pattern. Happy knitting!
27.02.2024 - 08:15Trots att jag har stor erfarenhet av virkning så är det här mönstret supper förvirrande och när jag läser de andra kommentarna så är jag inte den ända så ni kanske ska se över mönstret och se hur de kan bli mer lätt att förstå
05.09.2023 - 22:24Bonjour, En français il est dit de faire des brides, et en a anglais le mot employé est « treble », qui sont des doubles brides. Quel est la version « juste » ? Pour le dos, il est demandé au 2e rang de l’épaule d’augmenter en début de rang pour l’encolure, puis de faire 30 mailles en l’air en fin de rang pour l’encolure. Mais l’encolure ne peut pas être en début ET en fin de rang. Est-ce une erreur ? Merci
09.07.2023 - 19:11DROPS Design answered:
Bonjour, dans ce top on utilise des brides (treble crochet en anglais) et des doubles brides (double treble crochet en anglais). Les mailles en air devrait etre crochetees a la fin de l'epaule gauche du dos ('...ne pas oublier INFO CROCHET et crocheter 2 brides dans la dernière bride (= côté encolure) = 18-19-19-21-20-21 brides. Crocheter ensuite souplement 30-30-32-32-34-34 mailles en l'air pour l'encolure et joindre avec 1 maille coulée dans la dernière bride de l’épaule droite'...). Bon crochet!
25.07.2023 - 16:19