
Popular categories
Looking for a yarn?


|
||||||||||||||||||||||||||||||||||||||||
Sky Feather Sweater |
||||||||||||||||||||||||||||||||||||||||
 |
 |
|||||||||||||||||||||||||||||||||||||||
Knitted jumper in DROPS Sky and DROPS Kid-Silk. Piece is knitted top down with saddle shoulders and cables. Size: S - XXXL
DROPS 226-46 |
||||||||||||||||||||||||||||||||||||||||
|
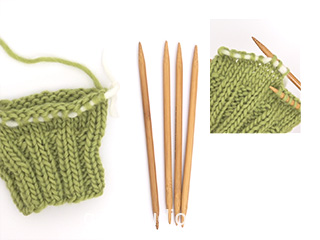
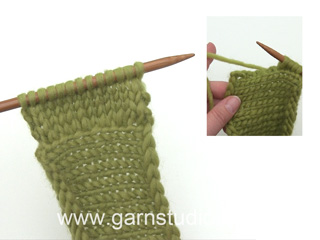
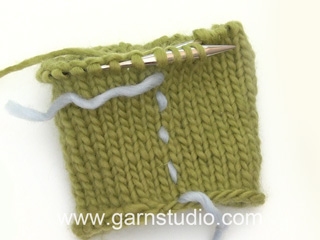
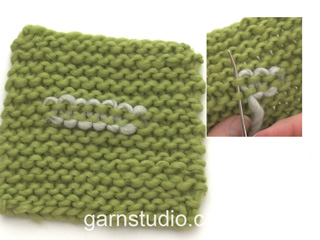
---------------------------------------------------------- EXPLANATION FOR THE PATTERN: ---------------------------------------------------------- GARTER STITCH (back and forth): Knit all rows. 1 ridge vertically = knit 2 rows. GARTER STITCH (worked in the round): 1 ridge vertically = 2 rounds, i.e. knit 1 round and purl 1 round. PATTERN: See diagrams A.1 to A.3. Choose diagram for your size. Diagrams show all rows in pattern seen from the right side. INCREASE/DECREASE TIP (evenly): To calculate how to increase/decrease evenly, use the total number of stitches increases/decreases are done over (e.g. 26 stitches) and divide by number of increases/decreases to be done (e.g. 11) = 2.4. In this example increase by making 1 yarn over after alternately approx. every 2nd and 3rd stitch. On next round work yarn overs twisted to avoid holes. If decreasing knit in this example alternately approx. every and every 2nd stitch together and every 2nd and 3rd stitch together. INCREASE TIP-1 (applies to neck edge): Increase 1 purl stitch to 2 purl stitches by making 1 yarn over before 1 purl stitch. On next round purl yarn over twisted to avoid holes. Then purl the new stitches. INCREASE TIP-2 (from right side): BEFORE MARKER: The new stitch is twisted towards the right. Use left needle to pick up yarn between 2 stitches from round below, pick up yarn from the back and knit stitch in front loop of stitch. AFTER MARKER: The new stitch is twisted towards the left. Use left needle to pick up yarn between 2 stitches from round below, pick up yarn from the front and knit stitch in back loop of stitch. DECREASE TIP (applies to mid under sleeves): Decrease 1 stitch on each side of marker thread as follows: Work until 3 stitches remain before marker thread, knit 2 together, knit 2 stitches (marker thread is between these 2 stitches), slip 1 stitch knitwise, knit 1, pass slipped stitch over stitch worked (= 2 stitches decreased). CAST-OFF TIP: To avoid a tight cast-off edge when casting off, you may use a larger needle. If this still is too tight make 1 yarn over after approx. every 6th stitch while casting off (cast off yarn overs as stitches). ---------------------------------------------------------- START THE PIECE HERE: ---------------------------------------------------------- JUMPER - SHORT OVERVIEW OF THE PIECE: Work neck edge in the round on circular needle from right shoulder at the back, top down. Then work saddle shoulders back and forth separately. Work saddle shoulder on ½ needle size smaller than the garment to give the shoulders more hold. Then pick up stitches on each side of saddle shoulder, and then work in the round over all stitches while at the same time increasing for sleeves and for yoke. Now divide yoke for body and sleeves. Work body in the round on needle, top down. Work sleeves in the round on double pointed needles/short circular needle, top down. The entire garment is worked with 1 strand of each quality (= 2 strands). NECK EDGE: Cast on 64-68-72-76-80-80 stitches on a short circular needle size 4.5 mm with 1 strand of each quality (= 2 strands). Knit 1 round. Then work rib in the round = knit 1/ purl 1. When rib measures 4 cm, increase every other 1 purl stitch to 2 purl stitches - read INCREASE TIP-1 = 80-85-90-95-100-100 stitches. When piece measures 8 cm, increase the remaining 1 purl stitches to 2 purl stitches = 96-102-108-114-120-120 stitches. Cut the yarn. Now divide the piece for saddle shoulders, front piece and back piece. Slip the first 22-22-22-26-26-26 stitches on needle size 5 mm (= saddle shoulder), slip the next 26-29-32-31-34-34 stitches on a thread for front piece, slip the next 22-22-22-26-26-26 stitches on another thread for saddle shoulder, and slip the last 26-29-32-31-34-34 stitches on another thread for back piece. Then work saddle shoulder as explained below. SADDLE SHOULDER: = 22-22-22-26-26-26 stitches. Sett Insert a marker thread in the middle of row. NOW MEASURE PIECE FROM HERE! Begin by casting on 2 new stitches at the beginning of needle size 5 mm (= 2 edge stitches), work A.1 over the 22-22-22-26-26-26 stitches on needle, and cast on 2 new stitches at the end of row (= 2 edge stitches) = 26-26-26-30-30-30 stitches. Continue A.1 back and forth with 2 edge stitches in GARTER STITCH in each side - read explanation above. Work until saddle shoulder measures 6-7-7-8-9-10 cm from marker thread – finish after a row from wrong side and cast at the same time off 2 edge stitches in each side = 22-22-22-26-26-26 stitches remain. Cut the yarn. Put these 22-22-22-26-26-26 stitches on a thread. Work the other shoulder the same way. Then work yoke as explained below. Now work shoulder stitches, front piece and back piece on same circular needle size 5.5 mm, at the same time pick up stitches along the sides of the saddle shoulders. Beginning of round = right shoulder at the back. Work as follows from right side: Continue A.1 as before over the 22-22-22-26-26-26 saddle shoulder stitches, pick up 12-14-14-16-18-18 stitches inside 2 edge stitches in garter stitch along the side on saddle shoulder (pick up inside 2 edge stitches to make the edge more solid), knit over the 26-29-32-31-34-34 stitches from thread on front piece and increase at the same time 11-12-11-12-11-11 stitches evenly over these stitches – read INCREASE/DECREASE TIP (= 37-41-43-43-45-45 stitches), pick up 12-14-14-16-18-18 stitches inside 2 edge stitches in garter stitch along the other saddle shoulder, continue A.1 as before over the 22-22-22-26-26-26 saddle shoulder stitches, pick up 12-14-14-16-18-18 stitches inside 2 edge stitches in garter stitch along the other side on saddle shoulder, knit the 26-29-32-31-34-34 stitches from thread on back piece and increase at the same time 11-12-11-12-11-11 stitches evenly over these stitches, and pick up 12-14-14-16-18-18 stitches inside 2 edge stitches in garter stitch along the side on saddle shoulder. There are now 166-182-186-202-214-214 stitches on needle. Then work yoke as explained below. YOKE: Then work as explained below at the same time as inserting 4 markers in the piece as follows: 1st marker: Insert 1st marker before first stitch on round (= right shoulder at the back). 2nd marker: Continue A.1 as before over the 22-22-22-26-26-26 saddle shoulder stitches, insert 2nd marker before next stitch. 3rd marker: Work 61-69-71-75-81-81 stitches in stocking stitch (= front piece), insert 3rd marker before next stitch. 4th marker: Continue A.1 as before over the 22-22-22-26-26-26 saddle shoulder stitches, insert 4th marker before next stitch. Work 61-69-71-75-81-81 stitches in stocking stitch (= back piece). Move these 4 markers upwards when working, increase at each of these markers later. OVERVIEW OF NEXT SECTION: On next round begin pattern on front piece and back piece while at the same time starting sleeve increase. Read therefore sections with PATTERN and SLEEVE INCREASE before continuing and REMEMBER THE KNITTING TENSION! PATTERN: Work first round as follows: * Continue A.1 as before over the 22-22-22-26-26-26 saddle shoulder stitches, work 2-6-7-3-6-6 stitches in stocking stitch, work A.2 (= 18-18-18-22-22-22 stitches), work A.3 (= 21-21-21-25-25-25 stitches), work A.2 (= 18-18-18-22-22-22 stitches), work 2-6-7-3-6-6 stitches in stocking stitch *, work from *-* one more time. Continue pattern like this. SLEEVE INCREASE: Work pattern as explained above. AT THE SAME TIME on first round increase 4 stitches for sleeves as follows: Increase AFTER 1st and 3rd marker and increase BEFORE 2nd and 4th marker – read INCREASE TIP-2. Increase now only on sleeves and number of stitches on front piece and back piece stays the same. Work the increased stitches in stocking stitch. Increase like this every other round 2-5-4-5-4-0 times in total = 174-202-202-222-230-214 stitches. Piece now measures approx. 8-13-12-14-14-10 cm from marker thread. Then increase for yoke as explained below. YOKE INCREASE: Move the 4 markers from sleeve increase so that each of the 4 markers is in the outermost stitch in each side on front piece and back piece. There are now 26-32-30-36-34-26 stitches between stitches with marker on each sleeve. On next round increase 8 stitches for yoke by increasing both before and after each of the 4 stitches with marker - remember INCREASE TIP-2. Increase stitches on front piece, back piece and both sleeves, and work the increased stitches in stocking stitch. Increase like this every other round 9-7-9-9-10-14 times in total = 246-258-274-294-310-326 stitches. When all increases are done, the piece measures approx. 19-21-22-24-25-26 cm from marker thread. Work without increases until piece measures 20-22-23-26-27-28 cm from marker thread. Now divide yoke for body and sleeves. I.e. work next round as follows: Begin 1-1-2-1-1-2 stitches before stitch with 1st marker, slip the next 48-50-54-58-58-60 stitches on a thread for sleeve, cast on 8-10-12-14-16-18 new stitches on the needle (= in the side under sleeve), work the next 75-79-83-89-97-103 stitches as before (= front piece), slip the next 48-50-54-58-58-60 stitches on a thread for sleeve, cast on 8-10-12-14-16-18 new stitches on needle (= in the side under sleeve), and work as before over the last 75-79-83-89-97-103 stitches (= back piece). Cut the yarn. Remove the old markers. Finish body and sleeves separately. NOW MEASURE PIECE FROM HERE! BODY: = 166-178-190-206-226-242 stitches. Insert 1 marker in each side on body – in the middle of the 8-10-12-14-16-18 stitches that were cast on under each sleeve. Begin round before one marker, continue in the round with stocking stitch and A.2/A.3 as before – work in addition GARTER STITCH – read explanation above, over the middle 6 stitches in each side (3 stitch in garter stitch on each side of both markers). Work until piece measures 21-21-22-19-20-21 cm from division under sleeves. 6 cm remain until finished measurements. Try the jumper and work to desired length. To avoid the rib from contracting increase stitches evenly as explained below. Knit 1 round while increasing 16-18-20-20-22-24 stitches evenly - REMEMBER INCREASE/DECREASE TIP = 182-196-210-226-248-266 stitches. Switch to circular needle size 4.5 mm. Work rib in the round (= knit 1/purl 1 ) over all stitches for 6 cm. Cast off with knit over knit and purl over purl - read CAST-OFF TIP. Piece measures approx. 52-54-56-58-60-62 cm from shoulder and down. SLEEVE: Slip the 48-50-54-58-58-60 stitches from thread in one side of piece on double pointed needles or a short circular needle size 5.5 mm and pick in addition up 1 stitch in each of the 8-10-12-14-16-18 new stitches cast on under sleeve (with 1 strand Sky and 1 strand Kid-Silk) = 56-60-66-72-74-78 stitches. Insert 1 marker thread mid under sleeve – i.e. in the middle of the 8-10-12-14-16-18 stitches. Move the marker thread upwards when working; it should be used for decrease mid under sleeve. Begin round at the marker thread, work in stocking stitch in the round and continue A.1 over the middle 22-22-22-26-26-26 stitches on top of sleeve as before. When sleeve measures 3-3-3-2-2-2 cm from division, decrease 2 stitches mid under sleeve - read DECREASE TIP. Decrease like this every 3-3-3-2½-2½-2½ cm 3-3-4-6-6-6 times in total = 50-54-58-60-62-66 stitches. Continue without decreases until sleeve measures 34-33-32-30-29-29 cm from division (shorter measurements in the larger sizes because of wider shoulders and longer sleeve caps). Knit 1 round while decreasing 10 stitches evenly in all sizes = 40-44-48-50-52-56 stitches. Switch to double pointed needles size 4.5 mm. Work rib in the round = knit 1/purl 1 for 6 cm. Cast off with knit over knit and purl over purl - read CAST-OFF TIP. Sleeve measures approx. 40-39-38-36-35-35 cm from division. Work the other sleeve the same way. |
||||||||||||||||||||||||||||||||||||||||
Diagram explanations |
||||||||||||||||||||||||||||||||||||||||
|
||||||||||||||||||||||||||||||||||||||||

|
||||||||||||||||||||||||||||||||||||||||

|
||||||||||||||||||||||||||||||||||||||||

|
||||||||||||||||||||||||||||||||||||||||

|
||||||||||||||||||||||||||||||||||||||||

|
||||||||||||||||||||||||||||||||||||||||

|
||||||||||||||||||||||||||||||||||||||||
|
Have you made this or any other of our designs? Tag your pictures in social media with #dropsdesign so we can see them! Do you need help with this pattern?You'll find tutorial videos, a Comments/Questions area and more by visiting the pattern on garnstudio.com. © 1982-2024 DROPS Design A/S. We reserve all rights. This document, including all its sub-sections, has copyrights. Read more about what you can do with our patterns at the bottom of each pattern on our site. |
||||||||||||||||||||||||||||||||||||||||


With over 40 years in knitting and crochet design, DROPS Design offers one of the most extensive collections of free patterns on the internet - translated to 17 languages. As of today we count 304 catalogues and 11422 patterns - 11422 of which are translated into English (UK/cm).
We work hard to bring you the best knitting and crochet have to offer, inspiration and advice as well as great quality yarns at incredible prices! Would you like to use our patterns for other than personal use? You can read what you are allowed to do in the Copyright text at the bottom of all our patterns. Happy crafting!
Comments / Questions (17)
Hallo liebes Drops Team! Leider ist mir eine Kleinigkeit unklar. Wenn man die Sattelschulter mit A1 strickt, hören im Diagramm in Zeilen 5 und 6 die äußeren 3 Maschen auf. Wie stricke ich das? Vielen Dank für Ihre Antwort! Mit freundlichen Grüßen Emma
19.01.2024 - 18:12DROPS Design answered:
Liebe Emma, beide Muster werden über eine verschiedene Reihenanzahl gestrickt, dh die 3 ersten/letzten Maschen werden über 4 Reihen gestrickt aber Zopf stricken Sie über 6 Reihen, damit es immer 5 Reihen zwischen jedem Zopf gibt. Viel Spaß beim stricken!
22.01.2024 - 07:51Non capisco come eseguire i ferri 6 e 7 del diagramma A1. Come devo lavorare le due maglie dopo le due maglie a legaccio che non sono inserite nello schema? Grazie
11.01.2024 - 00:19DROPS Design answered:
Buonasera Federica, può riprendere a lavorare le 2 maglie più esterne dal 1° ferro. Buon lavoro!
17.03.2024 - 17:50A magyar nyelvű mintában csak az egyik fonal mennyiségét adja meg a minta, a másikat csak az alcímben említi.
27.05.2023 - 21:17Hei, når jeg skal strikke A1 (størrelse medium) på sadelskulderen, går mønsteret plutselig fra 22 masker til 18 masker uten at det er noen fellinger i omgangen før. Hva skal man gjøre med resterende masker som ikke står i mønsteret? Altså fra 6. omg på A1.
09.04.2023 - 18:58DROPS Design answered:
Hej Ingvild, du gentager de 3 yderste masker i hver side af A1, rapporten starter forfra efter 4 pinde i højden :)
13.04.2023 - 15:23Jeg falt for denne genseren pga den knalle klare blåfargen, men garnet som står i oppskriften ligner ikke på den fargen i det hele tatt. Stemmer det at det er det garnet som har blitt brukt? Drops Kid Silk 06 Blå tåke ser lysegrå ut og Drops Sky 15 Mint fins ikke, så jeg regner med det er Drops Sky 15 Aquamarine, men den ser ut som en veldig dus turkis. Jeg går utifra bildene på Lindehobby som det lenkes til her.
25.03.2023 - 18:42DROPS Design answered:
Hei Ingvild. Det er riktig at fargene som er brukt til denne genseren er DROPS Sky farge nr. 15, akvamarin og DROPS Kid-Silk farge nr 06, blå tåke. Men fargene du ser på skjermen kan avvike noe avhengig av skjermtype, på samme måte som garnpartier ofte avviker i noen grad fra fargebad til fargebad. Om du ønsker en mer blålig (litt mørkere) utgave, ta en titt på DROPS Sky farge nr. 13, lys jeansblå og DROPS Kid-Silk farge nr 08, lys jeansblå. Kanskje du liker de bedre? mvh DROPS Design
27.03.2023 - 14:05Hei Jeg lurer på hvordan strikker man de maskene som ikke er påtegnet i diagrammet? Skal det vere rillestrikk der også? Eller strikkes det uten riller?
10.03.2023 - 09:23DROPS Design answered:
Hei Monica. Det skal stå forklart i oppskriften. I denne oppskrifter står det mange steder at de 2 kantmaskene strikkes i riller, mens mange steder er det skrevet at x- antall masker skal strikkes i glattstrikk. Om du skriver hvor du er i oppskriften og hvilken str du strikker kan vi gi deg et mer nøyaktig svar. mvh DROPS Design
13.03.2023 - 10:38Bonjour, Est-il possible de ne faire ce pull qu'en Kid Silk, en doublant le fil ? Merci :-)
11.12.2022 - 14:42DROPS Design answered:
Bonjour Mme Des Fougères, 2 fils Kid-Silk risquent d'être trop peu pour obtenir la bonne tension, essayez avec 3 fils plutôt - la texture sera différente quoi qu'il en soit, il est recommandé de tricoter un échantillon au préalable (je le ferai avec 2 et 3 fils) pour bien vérifier votre échantillon mais également la texture obtenue et ainsi choisir l'alternative que vous préférez. Bon tricot!
12.12.2022 - 09:35Nie do końca rozumiem jak zacząć przerabiać karczek. Jestem obecnie na etapie, w którym robótka jest rozdzielona na cztery (przód, tył, 2x rękawy). Wykonałam pierwszą część rękawów saddle shoulders (dotarłam do tych 8 cm odmierzanych od markera na środku rękawa). W jaki sposób i co dokładnie mam teraz nabrać na druty?
06.11.2022 - 17:57DROPS Design answered:
Witaj Alicjo, teraz na prawej stronie robótki przerabiasz schemat A.1 ponad oczkami jednego ramienia, a następnie nabierasz oczka wzdłuż tej powstałej klapki ramienia (nabieramy oczka w odl. 2 oczek od brzegu, aby brzeg był jeszcze bardziej zwarty i sweter nie rozciągał się). To przypomina trochę nabieranie oczek wzdłuż pięty, zobacz na filmie TUTAJ. Patrz od 6-tej minuty filmu. Dalej przerabiaj jak w opisie. Pozdrawiamy!
08.11.2022 - 09:50Er staat een fout in het patroon. "Ga zo verder met de minderingen tot de mouw 34-33-32-30-29-29 cm meet vanaf de scheiding" moet "Ga zo verder ZONDER minderingen" zijn. Ik heb nu 6 keer teveel geminderd.
31.07.2022 - 14:13Buonasera, sto iniziando il lavoro delle spalle a sella. Non capisco però lo schema A1 (ma anche A3), perché le ultime due righe non hanno i primi e gli ultimi punti? Purtroppo non riesco a capire dove finiscono quei punti... Vi ringrazio tanto per i chiarimenti che potrete darmi. Dominga
27.07.2022 - 23:18DROPS Design answered:
Buonasera Dominga, abbiamo inoltrato la sua richiesta al settore design: se dovesse essere necessario troverà il modello corretto direttamente sul sito. Buon lavoro!
27.09.2022 - 21:36