
Popular categories
Looking for a yarn?


|
|||||||||||||||||||
Spill the Beans Cardigan |
|||||||||||||||||||
 |
 |
||||||||||||||||||
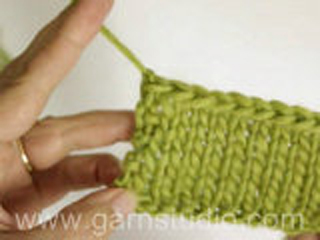
Knitted jacket in DROPS Alpaca. The piece is worked top down with double neck, raglan and cables. Sizes S - XXXL.
DROPS 244-6 |
|||||||||||||||||||
|
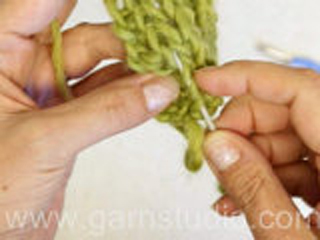
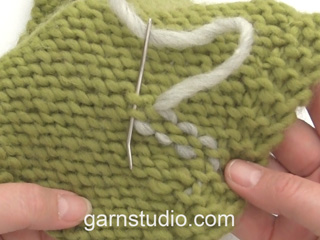
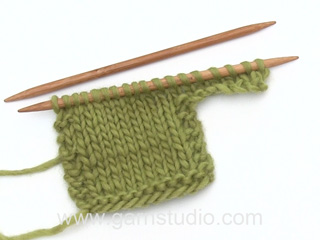
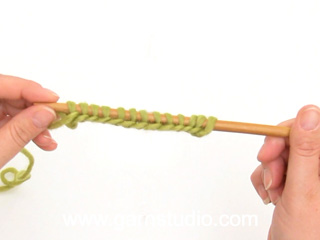
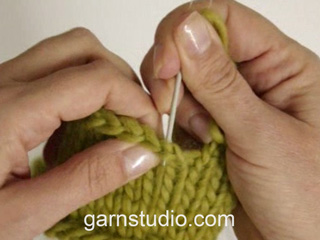
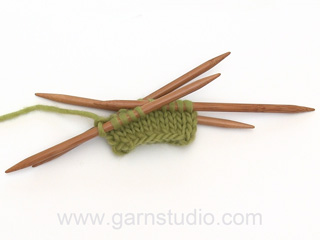
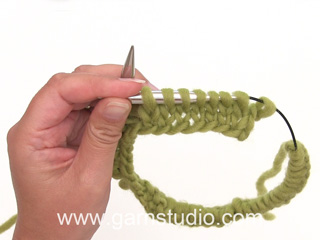
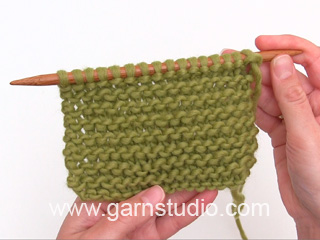
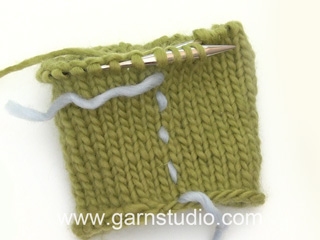
------------------------------------------------------- EXPLANATIONS FOR THE PATTERN: ------------------------------------------------------- GARTER STITCH (worked back and forth): Knit all rows. 1 ridge = knit 2 rows. PATTERN: See diagrams A.1 and A.2. The diagrams show all rows in the pattern from the right side. RAGLAN: Increase before/after A.2 in each transition between the body and sleeves. To start with increase on each side in each transition every 2nd row (8 stitches increased), then continue to increase on the front and back pieces every 2nd row and on the sleeves every 4th row, i.e., every 2nd increase is only on the body and not on the sleeves (4 stitches increased). Increase 1 stitch by making 1 yarn over, which is purled twisted on the next row to avoid holes. Work the new stitches in stocking stitch. DECREASE TIP (for sleeves): Decrease 1 stitch on either side of the marker-thread as follows: Work until there are 3 stitches left before the marker-thread, knit 2 together, knit 2 (marker-thread sits between these 2 stitches), slip 1 stitch knit-wise, knit 1 and pass the slipped stitch over the knitted stitch. BUTTONHOLES: Work buttonholes on the right band (when the garment is worn). Work from the right side when there are 4 stitches left on the row as follows: Make 1 yarn over, knit 2 together and knit 2. On the next row (wrong side), knit the yarn over to leave a hole. The first buttonhole is worked when the garter stitch on the front band stitches measures approx. 2 cm. Then work the other 5-5-5-6-6-6 buttonholes with approx. 8½-9-9½-8-8½-9 cm between each one. ------------------------------------------------------- START THE PIECE HERE: ------------------------------------------------------- JACKET – SHORT OVERVIEW OF THE PIECE. The neck and yoke are worked back and forth with circular needle, from mid front and top down. The yoke is divided for body and sleeves and the body continued back and forth with circular needle. The sleeves are worked in the round with double pointed needles/short circular needle. DOUBLE NECK: Cast on 126-126-138-138-150-154 stitches with circular needle size 2.5 mm and DROPS Alpaca. Purl 1 row from the wrong side, then work rib as follows from the right side: * Knit 2, purl 2 *, work from *-* until there are 2 stitches left, knit 2. Continue this rib for 5 cm. On the next 2 rows, cast on 7 stitches at the end of each row (band stitches) = 140-140-152-152-164-168 stitches. Continue the rib with 7 band stitches in GARTER STITCH -see description above, on each side until the neck measures 10 cm and with the last row from the wrong side (rib will be later folded towards the wrong side, so that the neck edge is approx. 5 cm). Remember the BUTTONHOLES – read description above. Insert a marker inside one of the bands; the yoke is measured from here. YOKE: Change to circular needle size 3.5 mm and work as follows from the right side: 7 band stitches in garter stitch, 9-9-13-13-17-17 stitches in stocking stitch, A.1, 20 stitches in stocking stitch (sleeve), A.1, 20-20-24-24-28-32 stitches in stocking stitch (back piece), A.1, 20 stitches in stocking stitch (sleeve), A.1, 9-9-13-13-17-17 stitches in stocking stitch, 7 band stitches in garter stitch. 1 stitch has been increased in each repeat of A.1= 144-144-156-156-168-172 stitches. Work next row from the wrong side as follows: 7 band stitches in garter stitch, 9-9-13-13-17-17 stitches in stocking stitch, A.1, 20 stitches in stocking stitch (sleeve), A.1, 20-20-24-24-28-32 stitches in stocking stitch (back piece), A.1, 20 stitches in stocking stitch (sleeve), A.1, 9-9-13-13-17-17 stitches in stocking stitch, 7 band stitches in garter stitch. Read the next section before continuing! Read RAGLAN in the explanations above. Start to increase on the next row from the right side. Continue with stocking stitch, bands in garter stitch and work according to diagram A.2 over diagram A.1. REMEMBER THE KNITTING TENSION! Increase for raglan every 2nd row 22-22-26-30-30-31 times in each transition between the body and sleeves = 320-320-364-396-408-420 stitches. Continue to increase for raglan on the front and back pieces every 2nd row and every 4th row on the sleeves. Increase 8-12-10-12-16-20 times on the front and back pieces (4-6-5-6-8-10 times on the sleeves). A total of 30-34-36-42-46-51 times on the front and back pieces and 26-28-31-36-38-41 times on the sleeves. When the raglan-increases are finished there are 368-392-424-468-504-540 stitches. Continue working as before until the yoke measures 20-22-24-27-29-32 cm from the marker. On the next row from the right side, divide for the body and sleeves as follows: Work 7 band stitches in garter stitch, 39-43-49-55-63-68 stitches in stocking stitch, A.2, place the next 72-76-82-92-96-102 stitches on a thread for the sleeve, cast on 10-10-12-12-14-14 stitches (in side under sleeve), work A.2, 80-88-96-108-120-134 stitches in stocking stitch, A.2, place the next 72-76-82-92-96-102 stitches on a thread for the sleeve, cast on 10-10-12-12-14-14 stitches (in side under sleeve), work A.2, 39-43-49-55-63-68 stitches in stocking stitch, 7 band stitches in garter stitch Finish the body and sleeves separately, the piece is now measured from here! BODY: = 244-260-284-308-340-364 stitches. Continue with stocking stitch, pattern and the bands in garter stitch (the new stitches under each sleeve are worked in stocking stitch) for a further 20-20-20-19-19-18 cm – adjust so the last row worked is row 4 in diagram A.2. The next row is from the right side and there are 244-260-284-308-340-364 stitches. Insert a marker on each side of the 13 stitches in each A.2 - so it is easier to match the following rib to the pattern. Repeat only row 4 onwards, over the 13 stitches in A.2. Work as follows from the right side: Work 7 band stitches in garter stitch, stocking stitch over the next 39-43-49-55-63-68 stitches and increase 18-22-20-20-18-25 stitches evenly spaced over these stitches (57-65-69-75-81-93 stocking stitches), work A.2 over the next 13 stitches, stocking stitch over the next 10-10-12-12-14-14 stitches and increase 2-2-4-4-6-6 stitches evenly spaced over these stitches (12-12-16-16-20-20 stocking stitches), work A.2 over the next 13 stitches, stocking stitch over the next 80-88-96-108-120-134 stitches and increase 36-44-40-40-36-46 stitches evenly spaced over these stitches (116-132-140-152-164-188 stocking stitches), work A.2 over the next 13 stitches, stocking stitch over the next 10-10-12-12-14-14 stitches and increase 2-2-4-4-6-6 stitches evenly spaced over these stitches (12-12-16-16-20-20 stocking stitches), work A.2 over the next 13 stitches, stocking stitch over the next 39-43-49-55-63-68 stitches and increase 18-22-20-20-18-25 stitches evenly spaced over these stitches (57-65-69-75-81-93 stocking stitches), 7 band stitches in garter stitch. There are 320-352-372-396-424-272 stitches. Work as follows from the wrong side: 7 band stitches in garter stitch, 57-65-69-75-81-93 stitches in stocking stitch, A.2 over 13 stitches, 12-12-16-16-20-20 stitches in stocking stitch, A.2 over 13 stitches, 116-132-140-152-164-188 stitches in stocking stitch, A.2 over 13 stitches, 12-12-16-16-20-20 stitches in stocking stitch, A.2 over 13 stitches, 57-65-69-75-81-93 stitches in stocking stitch, 7 band stitches in garter stitch. Now work rib from the right side as follows: Switch to circular needle size 2,5 mm. Work 7 band stitches in garter stitch, * knit 2, purl 2 *, work from *-* to 1 stitch before the first marker, knit 1, work A.2 over 13 stitches, knit 1, purl 2, work from *-* until there is 1 stitch left before the next marker, knit 1, work A.2 over 13 stitches, knit 1, purl 2, work from *-* until there is 1 stitch left before the next marker, knit 1, work A.2 over 13 stitches, knit 1, purl 2, work from *-* until there is 1 stitch left before the next marker, knit 1, work A.2 over 13 stitches, knit 1, purl 2, work from *-* until there are 9 stitches left, knit 2, 7 band stitches in garter stitch. From the wrong side work garter stitch over garter stitch, knit over knit and purl over purl. Continue this rib for 8 cm. Loosely cast off with knit over knit and purl over purl. The jacket measures approx. 52-54-56-58-60-62 cm from the shoulder down. SLEEVES: Place the 72-76-82-92-96-102 stitches from the thread on the one side of the piece on short circular needle/double pointed needles size 3.5 mm and knit up 1 stitch in each of the 10-10-12-12-14-14 stitches cast on under the sleeve = 82-86-94-104-110-116 stitches. Insert a marker in the middle of the new stitches under the sleeve. Start at the marker and work stocking stitch in the round. When the sleeve measures 4-3-3-4-2-3 cm decrease 2 stitches mid under sleeve – read DECREASE TIP. Decrease like this every 3½-3½-2½-1½-1½-1 cm a total of 9-9-12-16-18-20 times = 64-68-70-72-74-76 stitches. Continue working until the sleeve measures 35-34-32-30-28-25 cm from the division. Knit 1 round and increase 20-16-18-20-22-20 stitches evenly spaced = 84-84-88-92-96-96 stitches. Change to double pointed needles size 2.5 mm and work rib (knit 2, purl 2) for 8 cm. Loosely cast off with knit over knit and purl over purl. The sleeve measures approx. 43-42-40-38-36-33 cm from the division. Work the other sleeve in the same way. ASSEMBLY: Fold the neck double to the inside and fasten with a couple of stitches on each side. Sew the buttons onto the left band. |
|||||||||||||||||||
Diagram explanations |
|||||||||||||||||||
|
|||||||||||||||||||

|
|||||||||||||||||||

|
|||||||||||||||||||
|
Have you made this or any other of our designs? Tag your pictures in social media with #dropsdesign so we can see them! Do you need help with this pattern?You'll find tutorial videos, a Comments/Questions area and more by visiting the pattern on garnstudio.com. © 1982-2024 DROPS Design A/S. We reserve all rights. This document, including all its sub-sections, has copyrights. Read more about what you can do with our patterns at the bottom of each pattern on our site. |
|||||||||||||||||||


With over 40 years in knitting and crochet design, DROPS Design offers one of the most extensive collections of free patterns on the internet - translated to 17 languages. As of today we count 304 catalogues and 11422 patterns - 11422 of which are translated into English (UK/cm).
We work hard to bring you the best knitting and crochet have to offer, inspiration and advice as well as great quality yarns at incredible prices! Would you like to use our patterns for other than personal use? You can read what you are allowed to do in the Copyright text at the bottom of all our patterns. Happy crafting!
Comments / Questions (14)
Jeg har lavet udtagninger til Raglan, og der er 368 m på pinden. Der står jeg skal strikke som før, til arbejdet måler 20 cm. Før hvad? Før Raglan? der strikkede jeg A1, men A1 fortsætter jo ikke mønstret. Før det strikkede jeg Rib. Hvordan fortsætter jeg?
02.04.2024 - 15:53DROPS Design answered:
Hei Andrea. Du fortsetter å strikke som du har gjort, men du skal ikke øke til raglan. Altså, strikk stolpemaskene, glattstrikk og diagrammen, men ingen økninger. Maskeantallet skal være likt på alle omgangene frem til arbeidet måler 20 cm. mvh DROPS Design
08.04.2024 - 11:47Jeg kan ikke forstå hvorfor, der skal tages så mange masker ud, når rib starter. Det er ikke pænt, jeg gjorde det ikke og min rib, strikket på pinde 2 1/2 blev rigtig, ikke stram
29.03.2024 - 11:16Bonjour je souhaiterais connaître le mode d’entretien pour DROPS ALPACA ? S’il vous plaît merci d’avance Cordialement Mme Barathé
06.01.2024 - 12:05DROPS Design answered:
Bonjour Mme Barathé, retrouvez toutes les consignes d'entretien de DROPS Alpaca sur la page de son nuancier: onglet Entretien sous les couleurs. Bon tricot!
08.01.2024 - 10:04Strikker jakken i str L - mange feil i oppskrift vedr antall masker mv.. Har «fikset» mange undervegs i min jakke. F.eks BOL: 2 avsnitt - i feltet mellom de to A2 - 12 m + 4 økte = 16 i str L. Etter alle økninger er riktig anntall: 7+69+13+16+13+140+13+16+13+69+7=376 i str L. Det var også noe lenger fremme, men husker nå ikke hvor… Der er irriterende med feil i oppskrifter! Man blir usikker og det er jo ikke så kos…
19.11.2023 - 17:39I diagram 1 og 2 i denne oppskriften står det at : en svart maske(=beskrivelse av utseende av masken)= ingen maske, gå til neste rute. Hva betyr det? Mvh Kristin
12.10.2023 - 07:55DROPS Design answered:
Hej, Kristin, du hopper bare videre til næste maske (den sorte rude er den maske du tog ud med omslag og skal først strikkes på næste pind)
17.10.2023 - 14:00Bonjour,\r\nCeci concerne la taille XL\r\nDans le paragraphe tricoter ainsi dur l\'endroit pour le dos et les devants erreur dans la 1ère section aug dans les 12m jersey 4aug ce qui donne 16m et non 14m\r\nen ce qui concerne les aug avant les cotes je n\'ai aug que 18m et non 20 dans chaque devant sinon le résultat n\'allait pas\r\nbonne journée merci pour tous vos modèles
26.09.2023 - 10:24Bij het breien van het patroon klopt volgens mij niet de boord heb ik gebreid dan naar de pas met het verdelen van de steken voor de steken bij de pas hoe ik steken over de pas geeft aan 120 steken en na de boord brijen hou ik 168 over waar blij dan de overige steken dan dat zijn 40 steken die ik over hou ik hoop dat u mij een uitleg kan geven groetjes maaik aarts
19.09.2023 - 09:38DROPS Design answered:
Dag Maaike,
Helaas begrijp ik je vraag niet helemaal. Houd je 40 steken over op de naald nadat je de pas in zijn geheel hebt gebreid? Welke maat ben je aan het breien?
05.10.2023 - 06:27I was asking about the rib at the end of the body, it doesn't specify to change the neddle size. Not the rib at the begining. At the end of the body, The rib is worked with 3.5mm or with 2.5 mm? Thank you.
18.09.2023 - 18:02DROPS Design answered:
Dear Lorette, thanks for noticing, the needle size has now been added, this means you will switch to the circular needle size 2,5 mm. Happy knitting!
19.09.2023 - 10:00Hi, i have a question. The body rib îs worked with 3.5 mm needles or 2.5 mm? It doesn't specify and i want to be sure. Thank you
13.09.2023 - 19:02DROPS Design answered:
Hi Lorette, You cast on and work rib with needle size 2.5 mm. Happy knitting!
14.09.2023 - 06:49Bonjour, faut-il vraiment ouvrir la 1ère boutonnière quand les cotes mesurent 2cm ou quand on a tricoté 2 cotes de bordure au pt mousse ? car une fois le col plié en 2 les boutonnières ne sont pas alignées merci d'avance pour votre réponse
12.09.2023 - 12:35DROPS Design answered:
Bonjour Mme Lafon, la 1ère boutonnière doit se trouver 2 cm après avoir monté les mailles de la bordure devant. Bon tricot!
12.09.2023 - 17:07