Clicking the ORDER button will redirect you to Wool Warehouse Direct Ltd website
The yarn cost is calculated from the pattern’s smallest size and the yarn’s cheapest product type. Looking for an even better price? You might find it on the DROPS Deals!
-------------------------------------------------------
Alternative Yarn – See how to change yarns here
Yarn Groups A to F – Use the same pattern and change the yarn here
Yarn usage using an alternative yarn – Use our yarn converter here
-------------------------------------------------------
Clicking the ORDER button will redirect you to Wool Warehouse Direct Ltd website
The yarn cost is calculated from the pattern’s smallest size and the yarn’s cheapest product type. Looking for an even better price? You might find it on the DROPS Deals!
= knit | |
= purl | |
= between 2 stitches make 1 yarn over | |
= slip 1 stitch knitwise, knit 2, pass slipped stitch over stitches worked | |
= no stitch, skip this square |
Each of our patterns has specific tutorial videos to help you.
These step-by-step tutorials might also help you:
Why is the knitting/crochet tension so important?
Knitting tension is what determines the final measurements of your work, and is usually measured per 10 x 10 cm. It is provided like so: number of stitches in width x number of rows in height - eg: 19 stitches x 26 rows = 10 x 10 cm.
The knitting tension is very individual; some people knit/crochet loosely while others work tightly. You adjust the knitting tension with the needle size, which is why the suggested needle size is only meant as a guide! You need to adjust this (up or down) to ensure that YOUR knitting tension matches the knitting tension provided in the pattern. If you work with a different knitting tension than provided you will have a different yarn consumption, and your work will have different measurements than what the pattern suggests.
The knitting tension also determines which yarns can replace each other. As long as you achieve the same knitting tension you can replace one yarn with another.
See DROPS lesson: How to measure your tension/gauge
See DROPS video: How to make a gauge tension swatch
How do I know how many balls of yarn I need?
The required amount of yarn is provided in grams, eg: 450 g. To calculate how many balls you’ll need you first need to know how many grams are in 1 ball (25g, 50g or 100g). This information is available if you click on the individual yarn quality on our pages. Divide the amount required with the amount of each ball. For example, if each ball is 50g (the most common amount), the calculation will be as follows: 450 / 50 = 9 balls.
Can I use a different yarn than what the pattern suggests?
The important thing when changing from one yarn to another is that the knitting/crochet tension remains the same. This is so that the measurements of the finished piece will be the same as on the sketch provided. It is easier to achieve the same knitting tension using yarns from the same yarn group. It is also possible to work with multiple strands of a thinner yarn to achieve the knitting tension of a thicker one. Please try our yarn converter. We recommend you to always work a test swatch.
Please NOTE: when changing yarn the garment might have a different look and feel to the garment in the photo, due to individual properties and qualities of each yarn.
See DROPS lesson: Can I use a different yarn than the one mentioned in the pattern?
What are the yarn groups?
All our yarns are categorised into yarn groups (from A to F) according to thickness and knitting tension – group A contains the thinnest yarns and group F the thickest. This makes it easier for you to find alternative yarns to our patterns, should you wish to switch yarn. All yarns within the same group have a similar knitting tension and can easily replace each other. However, different yarn qualities have different structures and properties which will give the finished work a unique look and feel.
How do I use the yarn calculator?
At the top of all our patterns you’ll find a link to our yarn calculator, which is a helpful tool should you wish to use a different yarn than suggested. By filling in the yarn quality you wish to replace, the amount (in your size) and number of strands, the calculator will present good alternative yarns with the same knitting tension. Additionally it will tell you how much you’ll require in the new qualities and whether you’ll need to work with multiple strands. Most skeins are 50g (some are 25g or 100g).
If the pattern is worked with multiple colours, every colour will have to be calculated separately. Similarly, if the pattern is worked with several strands of different yarns (for example 1 strand Alpaca and 1 strand Kid-Silk) you will have to find alternatives for each, individually.
Why do you show discontinued yarns in the patterns?
Since different yarns have different qualities and textures we have chosen to keep the original yarn in our patterns. However, you can easily find options among our available qualities by using our yarn calculator, or simply pick a yarn from the same yarn group.
It is possible that some retailers still have discontinued yarns in stock, or that someone has a few skeins at home that they would like to find patterns for.
The yarn calculator will provide both alternative yarn as well as required amount in the new quality.
What size should I knit?
If you think it's hard to decide what size to make, it can be a good idea to measure a garment you own already and like the size of. Then you can pick the size by comparing those measures with the ones available in the pattern's size chart.
You'll find the size chart at the bottom of the pattern.
See DROPS lesson: How to read size chart
Why do I get the wrong knitting tension with the suggested needle size?
The needle size provided in the pattern serves only as a guide, the important thing is to follow the knitting tension. And since knitting tension is very individual, you will have to adjust the needle size to ensure that YOUR tension is the same as in the pattern – maybe you’ll have to adjust 1, or even 2 needle sizes, up or down to achieve the correct tension. For this, we recommend that you work test swatches.
Should you work with a different knitting tension than the one provided, the measurements of the finished garment might deviate from the measurement sketch.
See DROPS lesson: How to measure your tension/gauge
See DROPS video: How to make a tension/gauge swatch
Why is the pattern worked top-down?
Working a garment top-down provides more flexibility and room for personal adjustment. For example it is easier to try the garment on while working, as well as making adjustments to length of yoke and shoulder caps.
The instructions are carefully explaining every step, in the correct order. Diagrams are adjusted to the knitting direction and are worked as usual.
How do I work according to a knitting diagram?
The diagram depicts all rows/rounds, and every stitch seen from the right side. It is read from bottom to top, from right to left. 1 square = 1 stitch.
When working back and forth, every other row is worked from the right side and every other row is worked from the wrong side. When working from the wrong side, the diagram will have to be worked reversed: from left to right, knit stitches are purled, purl stitches are knit etc.
When working in the round every round is worked from the right side and the diagram are worked from right to left on all rounds.
See DROPS lesson: How to read knitting diagrams
How do I work according to a crochet diagram?
The diagram depicts all rows/rounds, and every stitch seen from the right side. It is worked from bottom to top, from right to left.
When working back and forth every other row is worked from the right side: from right to left and every other row is worked from the wrong side: from left to right.
When working in the round, every row in the diagram are worked from the right side, from right to left.
When working a circular diagram you start in the middle and work your way outwards, counter clockwise, row by row.
The rows usually start with a given number of chain stitches (equivalent to the height of the following stitch), this will either be depicted in the diagram or explained in the pattern.
See DROPS lesson: How to read crochet diagrams
How do I work several diagrams simultaneously on the same row/round?
Instructions for working several diagrams after each other on the same row/round, will often be written like so: “work A.1, A.2, A.3 a total of 0-0-2-3-4 times". This means you work A.1 once, then A.2 is worked once, and A.3 is repeated (in width) the number of times provided for your size – in this case like so: S = 0 times, M = 0 times, L=2 times, XL= 3 times and XXL = 4 times.
The diagrams are worked as usual: begin with the first row in A.1, then work the first row in A.2 etc.
See DROPS lesson: How to read knitting diagrams
See DROPS lesson: How to read crochet diagrams
Why are the sleeves shorter in larger sizes?
The total width of the garment (from wrist-to-wrist) will be larger in the larger sizes, despite the actual sleeves being shorter. The larger sizes have longer sleeve caps and wider shoulders, so there will be a good fit in all sizes.
Where on the garment is the length measured?
The measurement sketch/schematic drawing provides information regarding the full length of the garment. If it’s a jumper or a jacket the length is measured from the highest point on the shoulder closest to the neckline, and straight down to the bottom of the garment. It is NOT measured from the tip of shoulder. Similarly, the length of yoke is measured from the highest point on the shoulder and down to where yoke is split into body and sleeves.
On a jacket measures are never taken along bands, unless specifically stated. Always measure inside band stitches when measuring the length.
See DROPS lesson: How to read a schematic drawing
What is a repeat?
Diagrams are often repeated on the round or in height. 1 repeat is the diagram the way it appears in the pattern. If it says to work 5 repeats of A.1 in the round, then you work A.1 a total of 5 times after/next to each other in the round. If it says to work 2 repeats of A.1 vertically/in height you work the entire diagram once, then begin again at the start and work the entire diagram one more time.
Why does the piece start with more chain stitches than it’s worked with?
Chain stitches are slightly narrower than other stitches and to avoid working the cast-on edge too tight, we simply chain more stitches to begin with. The stitch count will be adjusted on the following row to fit the pattern and measurement sketch.
Why increase before the rib edge when the piece is worked top-down?
The rib edge is more elastic and will contract slightly compared to, for example, stocking stitch. By increasing before the rib edge, you avoid a visible difference in width between the rib edge and the rest of the body.
Why increase in the cast-off edge?
It’s very easy to cast off too tightly, and by making yarn overs while casting off (and simultaneously casting these off) you avoid a too tight cast off edge.
See DROPS video: How to bind off with yarn overs (yo)
How do I increase/decrease on every 3rd and 4th row/round alternately?
To achieve an even increase (or decrease) you can increase on, for example: every 3rd and 4th row alternately, like so: work 2 rows and increase on the 3rd row, work 3 rows and increase on the 4th. Repeat this until the increase is complete.
See DROPS lesson: Increase or decrease 1 st on every 3rd and 4th row alternately
How can I work a jacket in the round instead of back and forth?
Should you prefer to work in the round instead of back and forth, you may of course adjust the pattern. You’ll need to add steeks mid-front (usually 5 stitches), and follow the instructions. When you would normally turn and work from the wrong side, simply work across the steek and continue in the round. At the end you’ll cut the piece open, pick up stitches to work bands, and cover the cut edges.
See DROPS video: How to knit steeks and cut open
Can I work a jumper back and forth instead of in the round?
Should you prefer to work back and forth instead of in the round, you may of course adjust the pattern so you work the pieces separately and then assemble them at the end. Divide the stitches for the body in 2, add 1 edge stitch in each side (for sewing) and work the front and back pieces separately.
See DROPS lesson: Can I adapt a pattern for circular needles into straight needles?
Why is the pattern slightly different than what I see in the photo?
Pattern repeats can vary slightly in the different sizes, in order to get the correct proportions. If you’re not working the exact same size as the garment in the photo, yours might deviate slightly. This has been carefully developed and adjusted so that the complete impression of the garment is the same in all sizes.
Make sure to follow instructions and diagrams for your size!
How do I make a women’s size garment into a men’s size one?
If you have found a pattern you like which is available in women’s size it’s not very difficult to convert it to men’s size. The biggest difference will be the length of sleeves and body. Start working on the women size that you think would fit across the chest. The additional length will be worked right before you cast off for the armhole/sleeve cap. If the pattern is worked top-down you can add the length right after the armhole or before the first decrease on sleeve.
Regarding additional yarn amount, this will depend on how much length you add, but it is better with a skein too many than too few.
How do I prevent a hairy garment from shedding?
All yarns will have excess fibres (from production) that might come off as lint or shedding. Brushed yarns (ie hairier yarns) have more of these loose, excess fibres, causing more shedding.
Shedding also depends on what is worn under or over the garment, and whether this pulls at the yarn fibres. It’s therefore not possible to guarantee that there will be no shedding
Below are some tips on how to get the best result when working with hairier yarns:
1. When the garment is finished (before you wash it) shake it vigorously so the looser hairs come off. NOTE: do NOT use a lint roller, brush or any method that pulls at the yarn.
2. Place the garment in a plastic bag and put it in your freezer - the temperature will cause the fibres to become less attached to each other, and excess fibres will come off easier.
3. Leave in the freezer for a few hours before taking it out and shaking it again.
4. Wash the garment according to the instructions on the yarn label.
Why does my garment pill?
Pilling is a natural process that happens to even the most exclusive of fibers. It's a natural sign of wear and tear that is hard to avoid, and that is most visible in high friction areas of your garment like a sweater's arms and cuffs.
You can make your garment look as new by removing the pilling, using a fabric comb or a pill/lint remover.
Cherry Cuddler |
||||||||||||||||
|
|
|||||||||||||||
Jumper with raglan and cables, worked top down for kids. Size 2 - 12 years Piece is knitted in DROPS Merino Extra Fine.
DROPS Children 30-14 |
||||||||||||||||
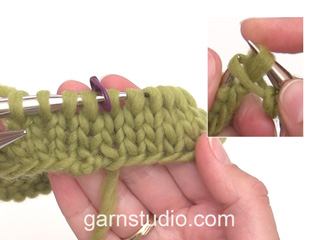
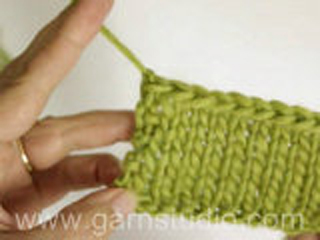
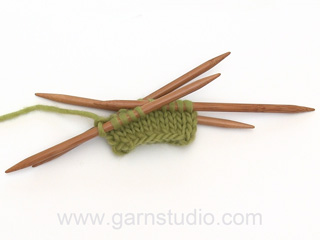
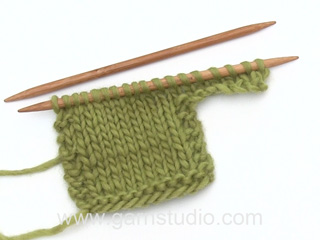
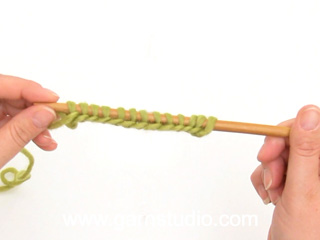
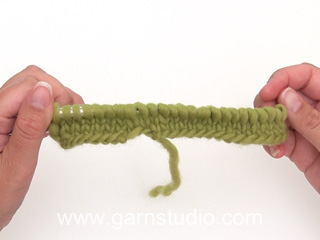
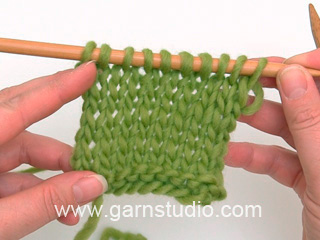
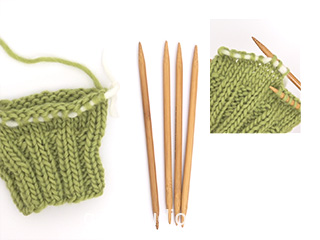
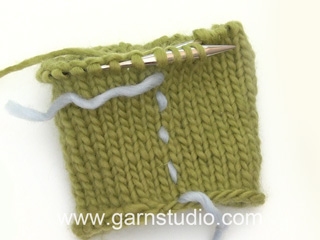
INFORMATION FOR PATTERN: GARTER STITCH (worked in the round): 1 ridge = 2 rounds. Knit 1 round and purl 1 round. PATTERN: See diagram A.1. RAGLAN: Increase for raglan on each side of A.1 in every transition between sleeves and body. INCREASE 1 STITCH BEFORE A.1 every other round: Work until A.1: Make 1 yarn over, work A.1. Knit yarn over on next round to make a hole. Work the increased stitches in stocking stitch. Repeat these 2 rounds. INCREASE 1 STITCH AFTER A.1 every other round: Work A.1, make 1 yarn over. Knit yarn over on next round to make a hole. Work the increased stitches in stocking stitch. Repeat these 2 rounds. INCREASE 1 STITCH BEFORE A.1 every 4th round: ROUND 1: Work until A.1. Make 1 yarn over, work A.1. ROUND 2: Knit yarn over to make a hole. ROUND 3: Work until 2 stitches remain before A.1: Knit 2 together, make 1 yarn over, work A.1. ROUND 4: Knit yarn over to make a hole. Repeat these 4 rounds. INCREASE 1 STITCH AFTER A.1 every 4th round: ROUND 1: Work A.1, make 1 yarn over. ROUND 2: Knit yarn over to make a hole. ROUND 3: Work A.1, make 1 yarn over, slip 1 stitch knitwise, knit 1 and pass slipped stitch over stitch worked ROUND 4: Knit yarn over to make a hole. Repeat these 4 rounds. DECREASE TIP (applies to sleeves): Decrease 1 stitch on each side of marker thread as follows: Work until 2 stitches remain before marker thread, knit 2 together (marker thread), slip 1 stitch knitwise, knit 1, pass slipped stitch over stitch worked (= 2 stitches decreased). ---------------------------------------------------------- JUMPER: Worked in the round on circular needle from mid back. Work top down. Work sleeves in the round on double pointed needles/a short circular needle, top down. YOKE: Cast on 72-76-80-80-84-84 stitches on a short circular needle size 4 mm with Merino Extra Fine. Work 2 ridges in GARTER STITCH - see explanation above. Then work as follows from mid back: Work 9-10-11-11-12-12 stitches in stocking stitch (= half back piece), A.1 (= 5 stitches), 8 stitches in stocking stitch (= sleeve), A.1, 18-20-22-22-24-24 stitches in stocking stitch (= front piece), A.1, 8 stitches in stocking stitch (= sleeve), A.1, 9-10-11-11-12-12 stitches in stocking stitch (= half back piece). REMEMBER THE KNITTING TENSION! Continue this pattern, AT THE SAME TIME begin increases for RAGLAN – see explanation above. NOTE! Increase differently on body and sleeves. INCREASE AS FOLLOWS ON FRONT/BACK PIECE: Increase 2 stitches on back piece and 2 stitches on front piece (= 1 stitch before/after A.1): Increase every other round 20-21-22-24-24-26 times in total. INCREASE AS FOLLOWS ON SLEEVES: Increase 2 stitches on each sleeve (= 1 stitch after/before A.1): Increase every other round 10-11-12-12-12-12 times, then increase every 4th round 5-5-5-6-6-7 times (15-16-17-18-18-19 times in total). After all increases are done there are 212-224-236-248-252-264 stitches on round. Work pattern as before until piece measures 15-16-16-18-18-19 cm from mid back. Work next round as follows: Work the first 31-33-35-37-38-40 stitches (= half back piece), slip the next 44-46-48-50-50-52 stitches on a stitch holder for sleeve, cast on 6-6-6-6-8-8 new stitches (= in the side under sleeve), work the next 62-66-70-74-76-80 stitches (= front piece), slip the next 44-46-48-50-50-52 stitches on a stitch holder for sleeve, cast on 6-6-6-6-8-8 new stitches (= in the side under sleeve), work the last 31-33-35-37-38-40 stitches (= half back piece). Finish body and sleeves separately. NOW MEASURE THE PIECE FROM HERE! BODY: = 136-144-152-160-168-176 stitches. Continue working in stocking stitch in the round over all stitches. When piece measures 14-17-21-23-27-30 cm from division, knit 1 round while increasing 28-28-32-32-36-36 stitches evenly = 164-172-184-192-204-212 stitches. Switch to circular needle size 3.5 mm. Work rib = knit 2/purl 2 for 4 cm. Cast off stitches with knit over knit and purl over purl. Jumper measures approx. 36-40-44-48-52-56 cm from shoulder and down. SLEEVE: Slip the stitches from stitch holder in one side of piece on double pointed needles/a short circular needle size 4 mm and pick in addition up 1 stitch in each of the 6-6-6-6-8-8 new stitches cast on under sleeve = 50-52-54-56-58-60 stitches. Insert 1 marker thread mid under sleeve. Work in stocking stitch in the round. When piece measures 3 cm, decrease 1 stitch on each side of marker thread - read DECREASE TIP. Decrease like this every 2-3-3-3½-3½-4 cm 7-7-8-8-9-9 times in total = 36-38-38-40-40-42 stitches. Continue in stocking stitch until sleeve measures 19-24-28-31-36-40 cm. Knit 1 round while increasing 8-6-6-8-8-10 stitches evenly = 44-44-44-48-48-52 stitches. Switch to circular needle size 3.5 mm. Work rib = knit 2/purl 2 for 4 cm. Cast off stitches with knit over knit and purl over purl. Sleeve measures approx. 23-28-32-35-40-44 cm from division. Work the other sleeve the same way. |
||||||||||||||||
Diagram explanations |
||||||||||||||||
|
||||||||||||||||
Have you made this or any other of our designs? Tag your pictures in social media with #dropsdesign so we can see them! Do you need help with this pattern?You'll find tutorial videos, a Comments/Questions area and more by visiting the pattern on garnstudio.com. © 1982-2024 DROPS Design A/S. We reserve all rights. This document, including all its sub-sections, has copyrights. Read more about what you can do with our patterns at the bottom of each pattern on our site. |
With over 40 years in knitting and crochet design, DROPS Design offers one of the most extensive collections of free patterns on the internet - translated to 17 languages. As of today we count 304 catalogues and 11422 patterns - 11422 of which are translated into English (UK/cm).
We work hard to bring you the best knitting and crochet have to offer, inspiration and advice as well as great quality yarns at incredible prices! Would you like to use our patterns for other than personal use? You can read what you are allowed to do in the Copyright text at the bottom of all our patterns. Happy crafting!
Comments / Questions (43)
Martine Verschaete wrote:
Kunnen de mouwen gebreid worden van beneden naar boven ZONDER rondbreien maar op traditionele manier om ze achteraf in te naaien?
22.03.2024 - 11:22Kate Vestergaard wrote:
Når jeg kigger på billederne, ser trøjen utrolig bred ud til at være en trøje til en pige. Er det billedet, der snyder? Eller er det en bred model?
03.03.2024 - 07:36DROPS Design answered:
Hei Kate. Ta en titt på målskissen (nederst på siden), der finner du cm målene. Sammenlign disse målene med en genser pigen til vanlig bruker. Så får du dobbeltsjekke om den blir for bred i den str. du tenker å strikke. mvh DROPS Design
04.03.2024 - 14:10Cecilia Pellegrini wrote:
Hola. Me puedes explicar cuántas veces repetir el aumento de 1 punto antes y después cada 2 vueltas? Cuantas veces repetir lo mismo cada 4 vueltas? Cuándo comenzar con los aumentos del frente y espalda? Muchas gracias
06.06.2023 - 02:57DROPS Design answered:
Hola Cecilia, tras trabajar la primera vuelta del canesú, en la siguiente vuelta comenzar los aumentos en la espalda como en el delantero. La siguiente vuelta se trabaja sin aumentos. Repetir de esta manera, aumentando cada 2ª vuelta. Aumentas 20-21-22-24-24-26 veces en total, por lo que trabajarás (para la talla más pequeña) 40 vueltas. Trabajar los aumentos de las mangas igual que los del cuerpo, empezando en la misma vuelta, 10-11-12-12-12-12 veces. En la siguiente vuelta para la manga, trabajar este aumento como se indica en la sección RAGLÁN- cada 4ª vuelta. Repetir las 4 vueltas ahí indicadas 5-5-5-6-6-7 veces (incluyendo la 1ª vez).
17.06.2023 - 18:12Anne wrote:
Und wo beginnt bei den Ärmeln die Runde?
02.02.2023 - 21:02DROPS Design answered:
Liebe Anne, bei den Ärmeln beginnen die Runde in der Mitte der neuen angeschlagenen Maschen - siehe auch Fotos bei der Lektion. Viel Spaß beim stricken!
03.02.2023 - 08:28Anne wrote:
Hallo, ich stehe gerade auf dem Schlauch. Wo ist denn die untere Ärmelmitte? Ist das die Mitte von den neu aufgenommenen Maschen? Danke schonmal...
02.02.2023 - 21:01DROPS Design answered:
Liebe Anne, ja ganz genau, schauen Sie mal diese Lektion, ab Bild 18 A/B zeigen wir, wie die Ärmel gestrickt werden. Viel Spaß beim stricken!
03.02.2023 - 08:27Odilie Pineau wrote:
Bonjour, j'ai un souci au niveau des augmentations avant et après A1. J'en suis au début de ce pull, mais sur mon ouvrage, les augmentations par jeté avant A1 font un trou deux fois plus grand que les jetés après A1 . Le résultat n'est pas esthétique car pas symétrique.... Comment puis je faire que les trous aient tous à peu près le même diamètre ?merci pour votre réponse. Cordialement
19.02.2022 - 23:02DROPS Design answered:
Bonjour Mme Pineau, c'est peut-être dû à votre façon de faire le jeté entre 1 maille endroit et 1 maille envers (avant A.1) et entre 1 maille envers et 1 maille endroit (après A.1), essayez de serrer le fil un peu plus lorsque vous faites le jeté après la maille envers, ça devrait pouvoir aider. Bono tricot!
21.02.2022 - 09:54Vanderbeken wrote:
Bonjour souci au niveau du terme demi dos dois je commencer dès début du premier tour? si je calcule le nombre de mailles ( j ai fait taille 11/12 ans), il me reste 7 mailles sur l aiguille au premier tour apres les 2 premiers rangs et si je commence mon travail a partir du milieu des mailles montées, je n'ai pas assez de mailles ( moitié = 41 mailles ) J essaie de me familiariser avec le vocabulaire ( vos explications) et la manipulation des aiguilles circulaires. merci
20.11.2021 - 12:28DROPS Design answered:
Bonjour Mme Vanderbeken, les tours se tricotent à partir du milieu du dos et vous tricotez vos 84 m ainsi: 12 m (1ère moitié du dos), A.1 (raglan = 5 m), 8 m (manche), A.1, 24 m (devant), A.1, 8 m (manche), A.1 et 12 m (2ème moitié du dos), vous devez ainsi avoir: 12+5+8+5+24+5+8+5+12=84 m. En espérant que ceci puisse vous aider. Bon tricot!
22.11.2021 - 07:47Débora wrote:
CUERPO: = 136 puntos. Continuar tejiendo en punto jersey en redondo sobre todos los puntos. Cuando la pieza mida 14cm a partir de la división, tejer 1 vuelta de derecho disminuyendo 28- puntos distribuidos equitativamente = 164 puntos. En esta parte se disminuye o aumenta ?? Porque el total de puntos confunde un poco
28.05.2020 - 22:39DROPS Design answered:
Hola Debora. Son 28 puntos aumentados. (ha sido una errata de la traducción). Gracias.
31.05.2020 - 21:04Carine Baeghe wrote:
Bonjour Tour 3 : tricoter 2 m ensemble 1 jeté. Donc en réalité on ne fait pas d augmentations puisque l on diminue d une maille donc je n arruve pas à comprendre pq une augmentation et ensuite diminuer merxi
14.04.2020 - 22:41DROPS Design answered:
Bonjour Mme Baeghe, si par "Tour 3" vous entendez le 1er et le 5ème tour de A.1 (à partir du bas), alors vous ne tricotez ps 2 mailles ensemble à l'endroit mais juste 2 mailles endroit et on repasse la maille glissée par-dessus ces 2 mailles. Au tour suivant, on fait 1 jeté entre les 2 m end (= on a de nouveau 3 mailles). Cette vidéo montre comment réaliser ce motif (on tricote ici les 3 mailles à l'endroit, le résultat est approximativement le même). Bon tricot!
15.04.2020 - 08:11Covadonga wrote:
En la parte del cuerpo, en la última vuelta antes de llegar al elastico hay que aumentar o disminuir? Creo que hay un error y dice disminuir pero luego suma 136 +28=212. Hay que disminuir o aumentar
06.04.2020 - 00:43DROPS Design answered:
Hola Covadonga. Son 28 puntos aumentados. (ha sido una errata de la traducción). Gracias.
31.05.2020 - 21:07